The Custom Form for Magento 2 extension allows store owners to effortlessly create and manage multiple forms using an intuitive drag-and-drop builder. With support for a wide range of input field types, you can design contact forms, feedback forms, surveys, and more—without touching a single line of code.Forms can be easily embedded on any CMS page, enabling flexible placement throughout your store. After submission, customers can be redirected to a custom thank-you page or any URL of your choice. All submitted data is securely captured and stored for further processing or follow-up.
This extension is fully compatible with the Hyvä storefront and works seamlessly with Hyvä Checkout out of the box.
Table of Content
Features
- Supports various input field types
- Intuitive drag-and-drop form builder
- Easily embed forms on any CMS page
- Redirect users to a custom page after submission
- Capture and store customer information
- Fully compatible with Hyvä storefront
- Works seamlessly with Hyvä Checkout by default
Steps:
- Extension Installation Guide
- Configuration
Command
- Download the zip file
- Extract and put it into /app/code/
- Open Cli in the Magento directory and follow the below commands:
- php bin/magento setup:upgrade
- php bin/magento setup:di:compile
- php bin/magento setup:static-content:deploy
- php bin/magento cache:clean
- php bin/magento cache:flush
- Configuration:
- To set up email notifications, navigate to: Stores → Configuration → VDCStore Extensions → Custom Forms.
Admin Notification
- To set up email notifications, navigate to: Stores → Configuration → VDCStore Extensions → Custom Forms.
Admin Notification
- To set up email notifications, navigate to: Stores → Configuration → VDCStore Extensions → Custom Forms.

- General Configuration :
- Enable Email Notifications – Set to “Yes” to activate automatic email alerts.
- Recipient Email Address – Define the email address where notifications should be sent.
- Email Sender Identity – Choose the sender contact to appear in outgoing emails.
- Email Template Selection – Select the template that will format the email content.
- Reply Form Configuration
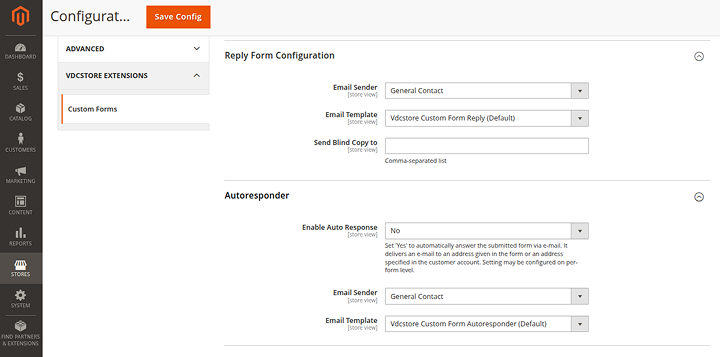
- In the Reply Form Configuration tab, choose the Email Sender, select the Email Template, and specify the Blind Copy (BCC) recipient.
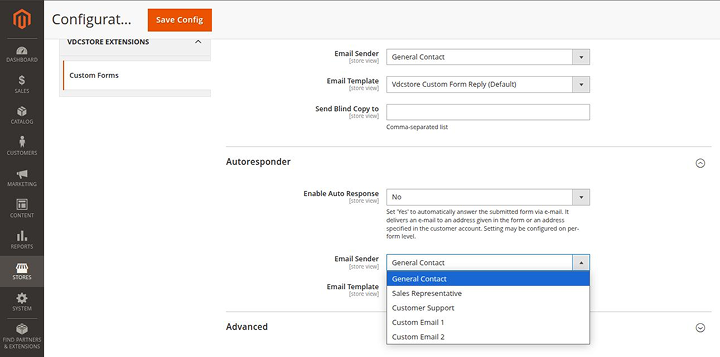
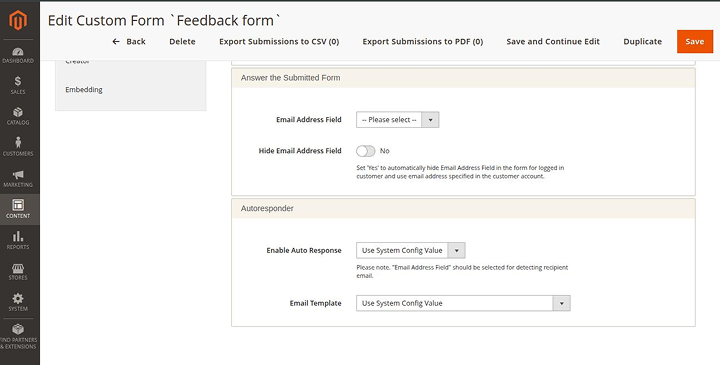
- Autoresponder
- The extension also allows you to set up automatic responses..
Enable Auto Response – Set this to “Yes” to automatically send a response email after form submission. The email will be delivered to the address entered in the form or the customer’s account email. This setting can be configured individually for each form.
Email Sender & Template – Choose the sender identity and select an email template (default: Amasty Custom Form Autoresponder).
Custom Form Grid
To view and manage all your created forms, navigate to: Content → Custom Forms → Forms.
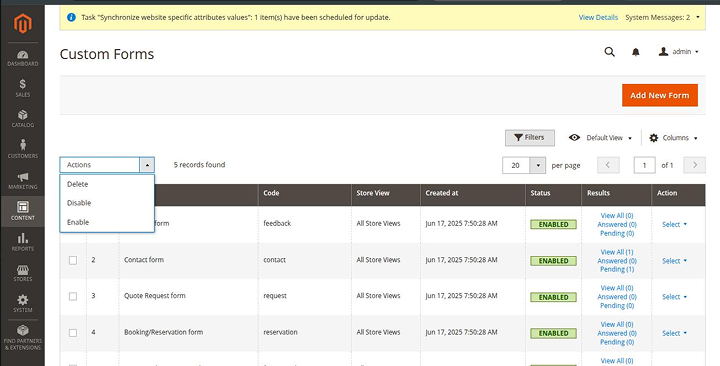
You can conveniently manage your forms from the grid view — track results, edit or duplicate forms using the actions column. Export submitted form data as CSV or PDF files when needed.
Use the Actions dropdown for bulk operations such as Delete, Disable, or Enable.
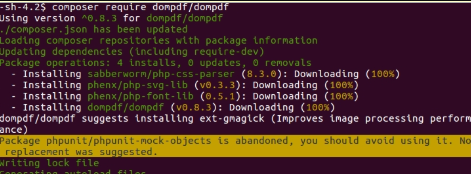
To enable PDF export, ensure the dompdf/dompdf library is installed. Run the following command in your site’s root directory:
composer require dompdf/dompdf
Custom Form Creation
To see and manage all created forms in one place, go to Content → Custom Forms → Forms.

On a handy grid you can easily track forms Results, Edit, Duplicate them in the action column. Also, you can Export Submitted Data to CSV or PDF files. Perform mass actions via Actions dropdown menu (Delete/Disable/Enable) if needed.
To use PDF functionality, please install the library dompdf/dompdf. To do this, run the command “composer require dompdf/dompdf” in the main site folder.
Click here to create Google api key.
Form Information
To create a new custom form, start by configuring the general settings.
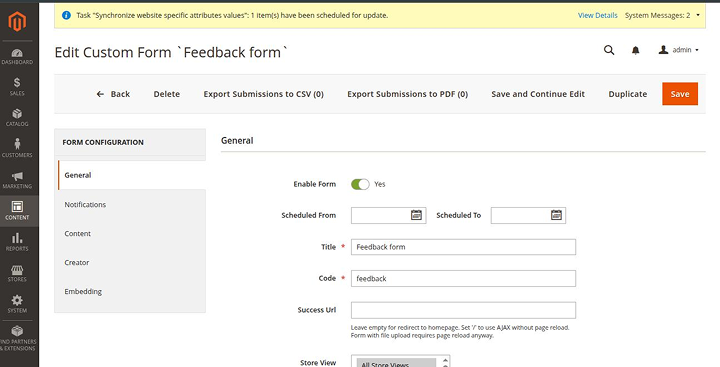
Form Status – Enable or disable individual forms as needed
Schedule Display – Define the start and end dates for when the form should be visible (e.g., during specific campaigns).
Form Title – Enter a title to identify the form in the custom forms grid.
Form Code – Use a unique code to reference the form for internal or administrative purposes.
Success URL – Enter “/” to submit the form via AJAX (no page reload). Leave blank to redirect users to the homepage. Note: file uploads always require a page reload.
Store View Assignment – Choose which store views the form should appear on.
Success URL – Enter “/” to submit the form via AJAX (no page reload). Leave blank to redirect users to the homepage. Note: file uploads always require a page reload.Store View Assignment – Choose which store views the form should appear on.
Target Customer Groups – Specify which customer groups can access and submit the form.
Track Submission Source – Enable to record the referring page URL for each submission.
Survey Mode – Enable to limit users to a single form submission. Disable to allow multiple submissions by the same user.
Email Notifications
You can configure admin notifications individually for each form. These settings will override the defaults set in the General Settings.
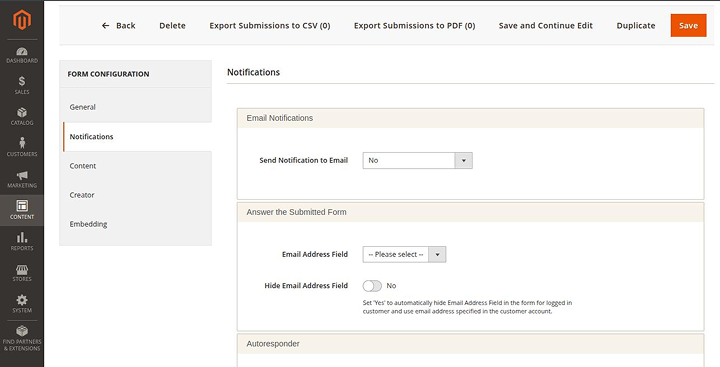
Auto Response Toggle – Turn the autoresponder on or off, or inherit the value from the system configuration.
Email Template Selection – Choose from default templates, use the system default, or create a custom template to appear in this dropdown.
Form Content
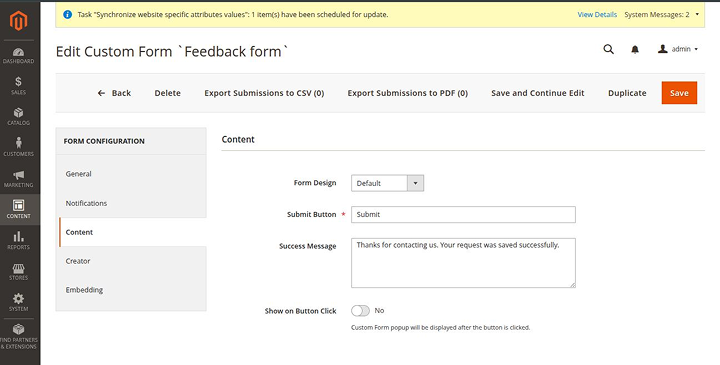
Form Design – Choose from three design options: Default (automatically selected unless changed), Linear Theme, or Circle Theme.
Submit Button Label – Enter custom text to be displayed on the form’s submission button.
Success Message – Define the confirmation message users will see after submitting the form successfully.
Display on Button Click – Enable this setting to show the form in a popup triggered by a button click.
Form Constructor
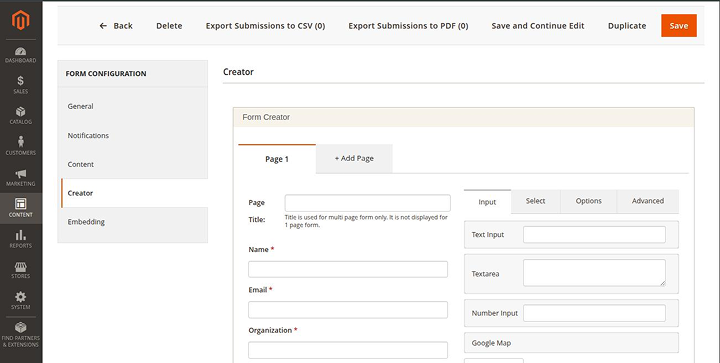
Within the Form Creator tab, you’ll have access to a wide variety of input fields and form components. Simply drag and drop your desired elements into the form builder area. If your form requires multiple steps or sections, you can add additional pages using the +Add Page option.
1. Input Type
In the Input tab, you’ll find various field options including:
- Text Input – Ideal for short – entries like names
- Text Area – Best suited for longer messages or customer feedback
- Number Input – For numeric values only
- Google Map – Allows users to pinpoint a location using an interactive map
2. Select Type
The Select tab provides options to include:
Date Picker – For selecting specific dates
Time Picker – For choosing a time value
File Upload Field – Allows users to attach files with their submission
3. Options Type
The Options tab includes a variety of fields that present users with predefined choices, such as:
- Dropdown Menu – A collapsible list of selectable options
- List Box – Displays multiple options in a box format
- Two Checkbox Variants – For single or multiple selections
- Two Radio Button Styles – For selecting one option from a group
4. Advanced Elements
You can enhance your custom forms further using the Advanced tab, which includes various heading styles and layout elements to help organize and structure your forms more effectively.
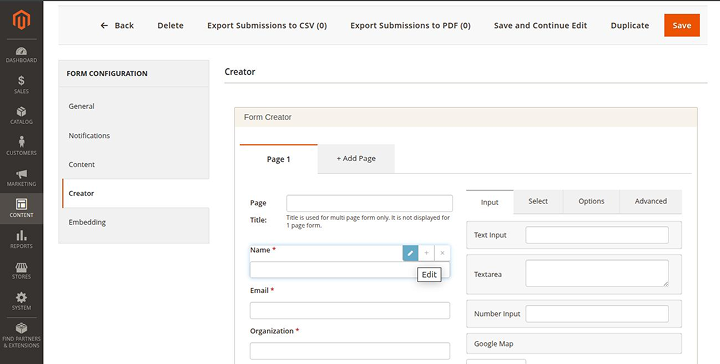
Editing Input Fields
Once you’ve added the necessary fields to your form layout, you can customize each one individually.
Each field can be edited immediately after dragging it into the form builder area.
To modify a field:
- Hover over the element and click the Edit icon.
- This opens a configuration panel where you can set specific properties.
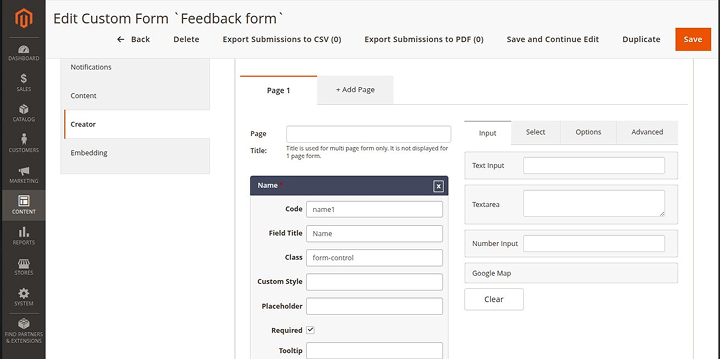
Available Field Settings:
- Code – Assign an internal identifier for admin-side reference.
- Field Title – Set the visible name of the field. This title is also useful for filtering submissions.
- Class – Indicates the input type (e.g., text, dropdown, etc.).
- Custom Style – Apply custom CSS styles to individual fields (e.g., font, color, spacing).
- Required – Toggle this on to make the field mandatory before submission.
- Tooltip – Add explanatory text that will appear as a tooltip on the frontend.
- Options – Define values for radio buttons, checkboxes, and dropdowns.
- Toggle – Enable this to visually switch the checkbox into a toggle-style field.
- Validation Rules – Set rules to ensure input follows a required format. Regular expressions are supported.
- Default Value – Pre-fill the field with a suggested or common entry.
- Max Length – Limit the number of characters allowed in a text-based field.
- Dependency Settings – Make a field appear only when a specific option is selected in another field.
- Layout Configuration – Choose from 1, 2, or 3-column layouts. In multi-column layouts, fields are positioned side-by-side within the same row.
Embedding
You can embed any custom form into a CMS page by copying the form’s code and pasting it into the desired CMS content area.
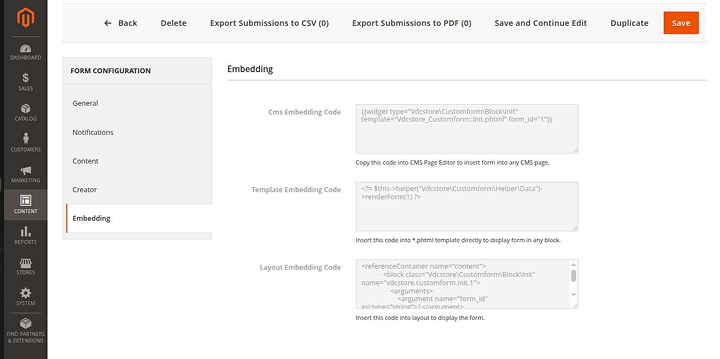
Embedding Custom Forms into Your Store Layout
To display a custom form anywhere on your storefront, you can insert its Layout Embedding Code directly into the layout file.
Alternatively, you can integrate the form into any CMS page using Magento widgets:
Navigate to Content → Widgets → Add Widget, then select the form and specify its Form ID during setup.Within the widget settings, you can also define how the form appears — either as a standard inline block or as a popup. This allows you to showcase the same form in various formats across different pages to suit your design needs.
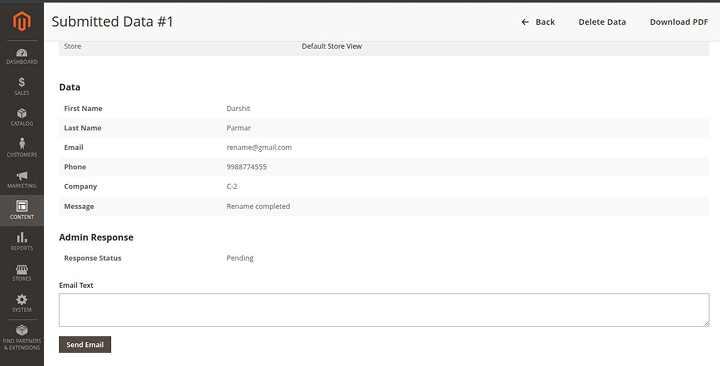
Track Submitted Data
To monitor and manage customer submissions, navigate to: Content → Custom Forms → Submitted Data..
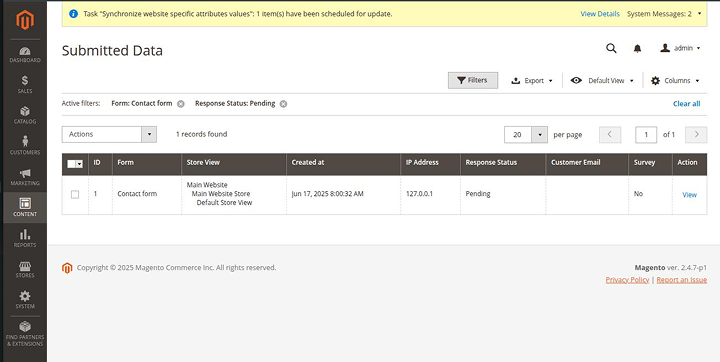
Exporting and Filtering Submissions
To export a specific submission, select its checkbox in the grid, go to the Export tab, and click the Export button. You can choose between CSV or PDF formats.
Use the available filters to quickly locate submitted data for a particular form – all custom forms are automatically included in the filter options.
You can also filter results by Response Status, Customer Email, or Survey Type (for survey-based forms).
Click on any submission to view its complete details.
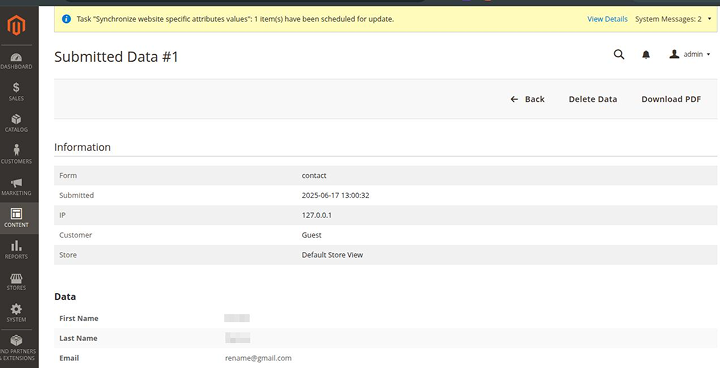
Admin is able to answer straight from the customers’ submitted data.