

Magento 2 Google Tag Manager

- for Magento 2.4.x (CE, EE)
This module integrates seamlessly with Google Analytics, Google Tag Manager offering detailed reports on Shopping Behavior, Checkout Behavior, and Product Performance.
This module integrates seamlessly with Google Analytics, Google Tag Manager offering detailed reports on Shopping Behavior, Checkout Behavior, and Product Performance.


User Guide
This will start tracking once you enable configuration, use the Magento 2 Google Tag Manager extension. This module integrates seamlessly with Google Analytics and Google Tag Manager offering detailed reports on Shopping Behavior, Checkout Behavior, and Product Performance. With just a few clicks, you can easily monitor website traffic and ssess how effectively visitors are being converted into customers. This tool simplifies tracking and provides actionable insights to optimize your online store’s performance.
Features
- Enhanced Marketing Capabilities : Leverage over 40 tags, triggers, and variables, dynamic remarketing, and seamless integration with Google Analytics 4 and Facebook Pixel for comprehensive tracking and targeted campaigns.
- Advanced Reporting Insights : Gain detailed insights with reports on shopping behavior, checkout behavior, product performance, sales trends, and product listing effectiveness to optimize your strategies.
- Website Performance Optimization : Implement event tracking without code changes to monitor user behavior and improve website performance.
- Version control : Enables you to monitor changes, tag different versions, and revert to earlier versions when needed. Smart Mapping: Map Magento 2 attributes to Salesforce fields manually.
Steps:

Extension Installation
- Download the zip file
- Extract and put it into /app/code/
- Open Cli in the Magento directory and follow the below commands:
- php bin/magento s:up
- php bin/magento s:d:c
- php bin/magento s:s:d -f
- php bin/magento i:rei
- php bin/magento c:f
- php bin/magento cron:install
- php bin/magento cron:run
How to Use
STEP 1

- To create account on Google Tag Manager account, click on the following link.
- https://marketingplatform.google.com/about/tag-manager/
STEP 2
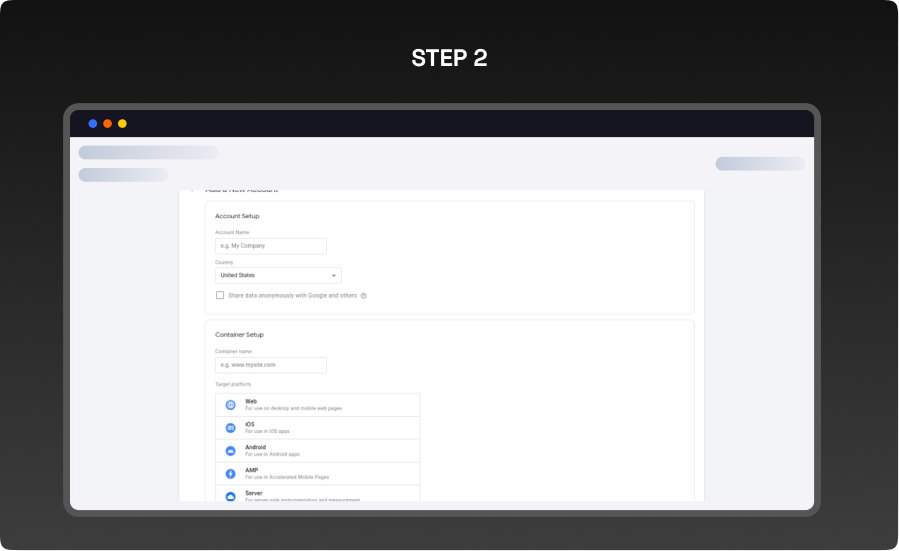
- Fill in all the necessary details to register, like:
- Account Setup : Enter your company s name in the ‘Account Name column and select your country.
- Container Setup : Enter the container s name in the Container Name column (for example www.mysite.com) and select your target platform
- After filling in all the necessary details, click ‘Create to proceed.
STEP 3
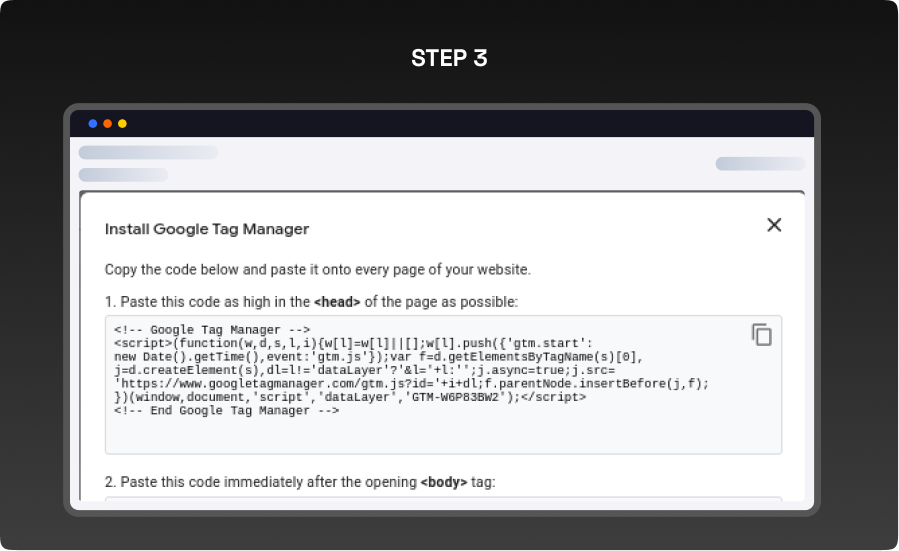
- Get your GTM ID from here and add this code to your Magento Configuration step (Check GTM Configuration step). and click on ‘OK’ to move forward.
STEP 4
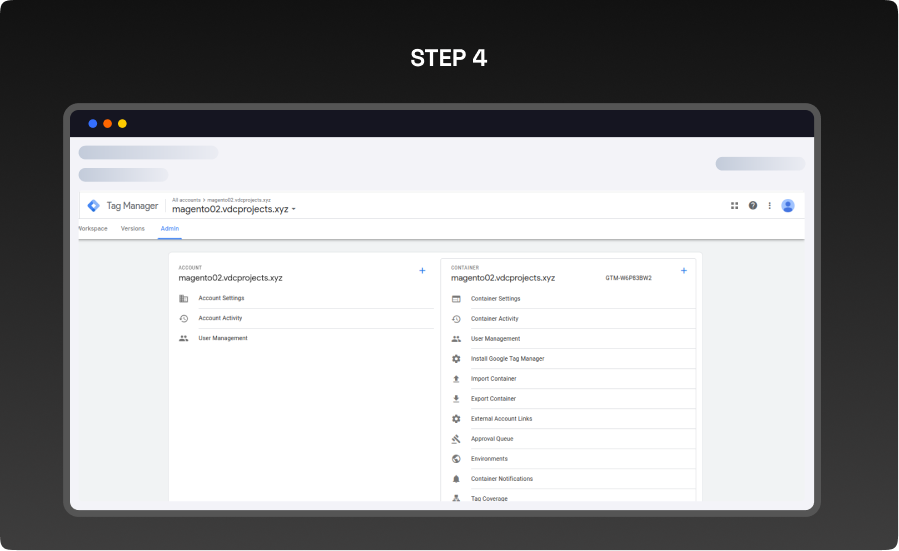
- Get your Container ID from the above.
- After completing all the Magento configuration, go to your GTM (Google Tag Manager) setup, click on the Admin option in the text bar, and import your JSON file into the container.
STEP 5
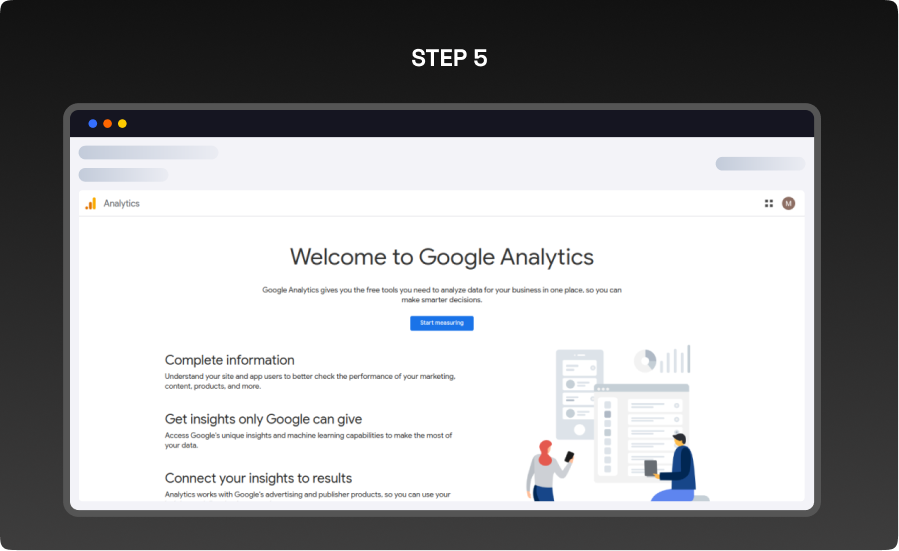
- To register for a Google Analytics account, kindly follow this link and click on the start measuring button.
- https://analytics.google.com/analytics/web/?authuser=0#/provision
STEP 6
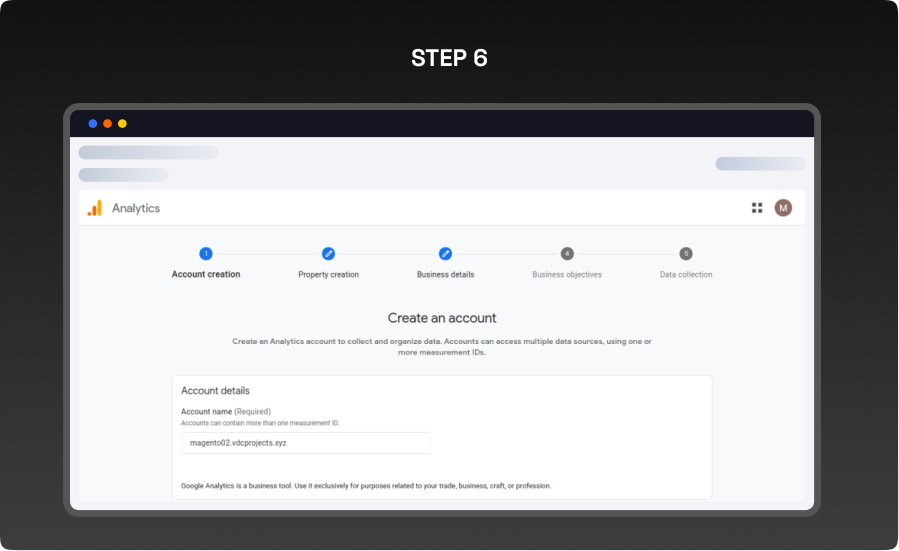
- First, click Start measuring to register using the Google Analytics tool and fill in all the necessary details.
STEP 7
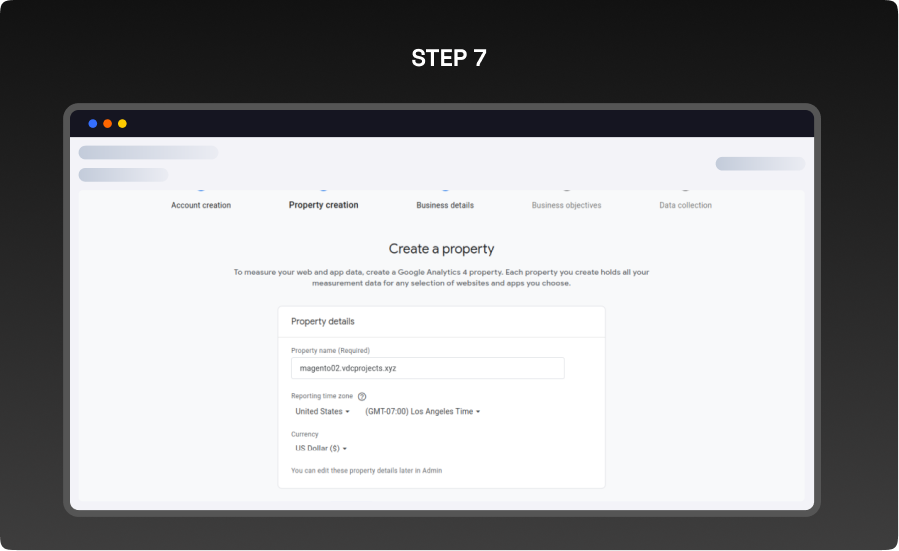
- Create a property Property name’, Reporting Time zone’, and Currency, and click on ‘Next to proceed.
STEP 8

- Describe your business like ‘Industry Category and Business size’.
STEP 9
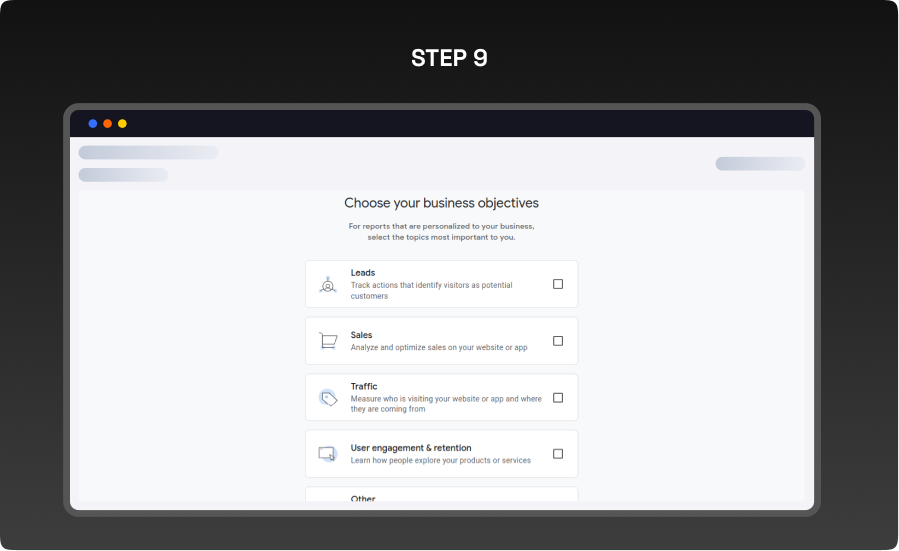
- Choose your business objectives like Leads’, ‘Sales’, ‘Traffic’, User Engagement and Registration’, and ‘Others’.
STEP 10
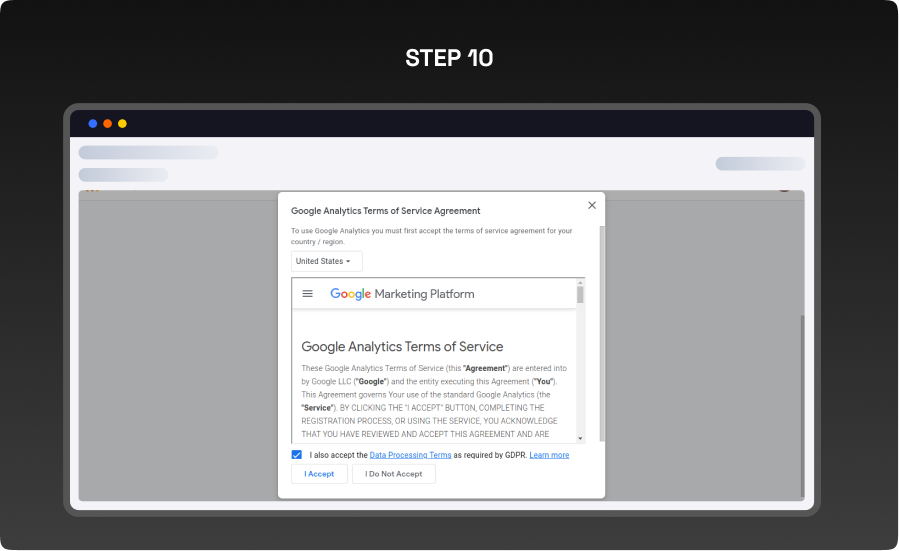
- Agree to the terms of service and then click the I accept button.
STEP 11
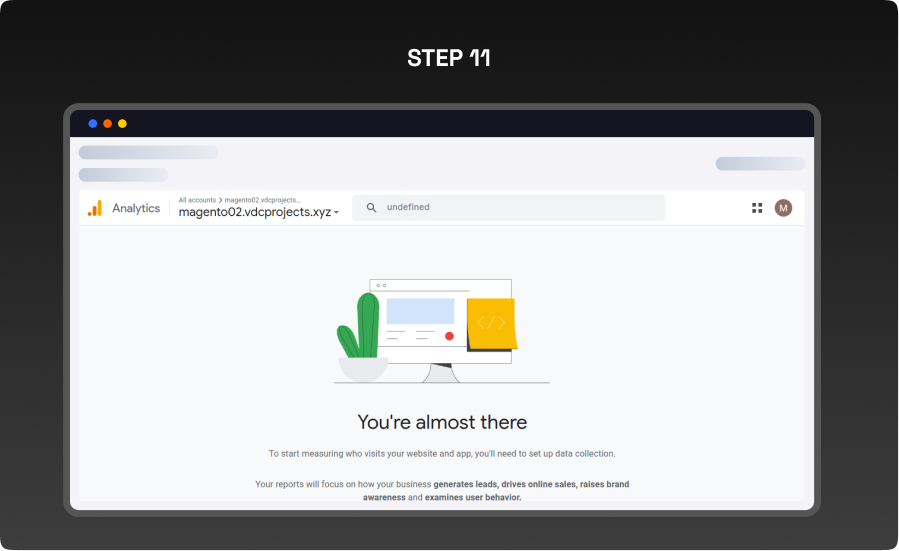
- Collect data and choose platforms Web’.
STEP 12
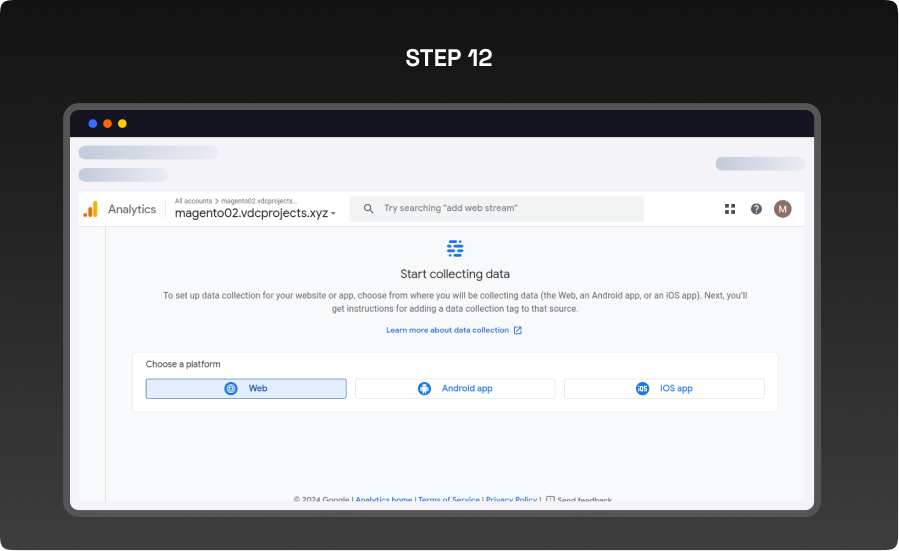
- Synchronization Setting
- Set up your web stream
- Enter your Website URL and ‘Stream Name and click on the Create & Continue button
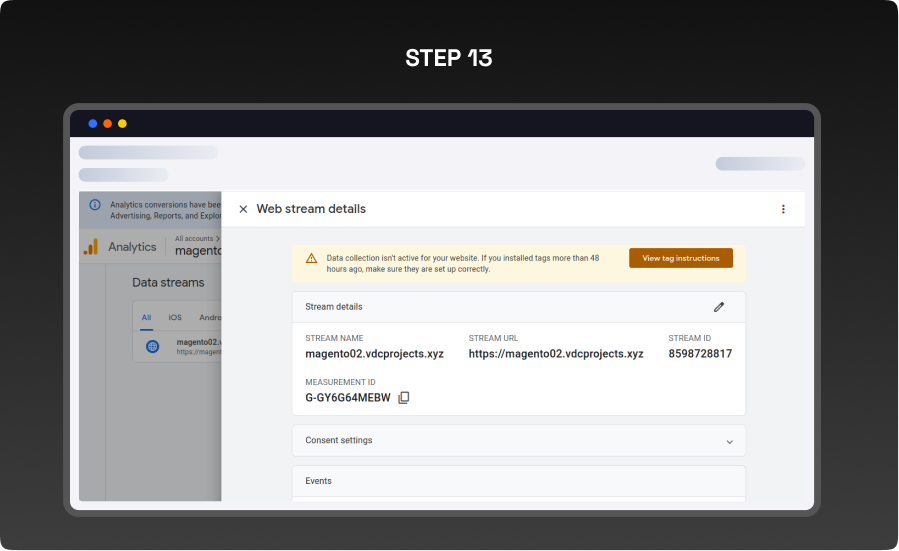
STEP 13
- Consumer Key: Locate this in Salesforce by navigating to Home > Platform Tools > Apps >App Manager, and select your app. Refer to the guide Get consumer key and consumer secret by connected app for details.
- If the registration is successful, you ll see the following interface and receive a GA measurement ID to install in Magento.
STEP 14
- Now, Scroll down to Measurement Protocol API Secrets and click on it. Then n the popup, click on the “Review Terms button and then select the I Acknowledge link. Once you do this, the Create button will be enabled. Click on it to proceed.
STEP 15
- Enter the Nickname as per your preference and click on the Create button to generate the secret API.
STEP 16
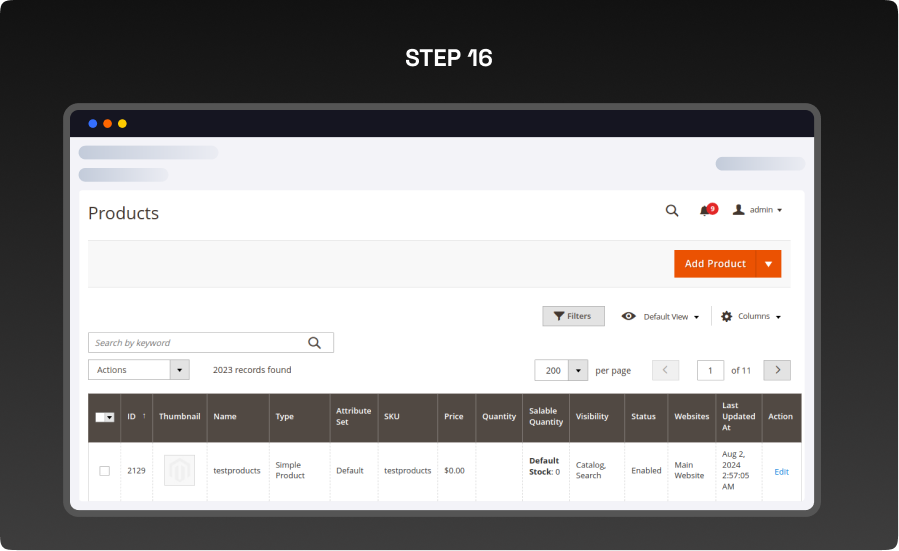
- As seen in the image, you will be able to get your secret API key. Copy the secret value.
CONFIGURATION
STEP 1
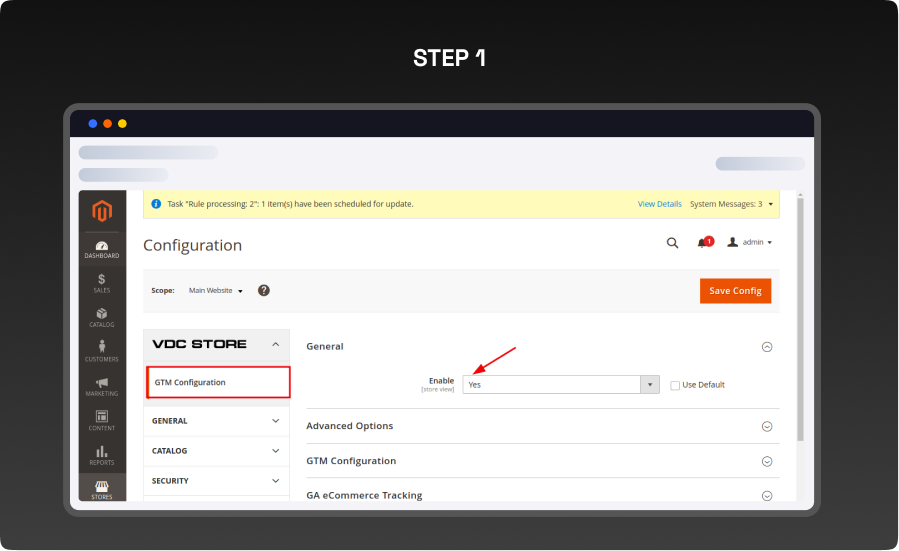
- Log in to the Magento Admin panel, then navigate to Stores > Configuration > VDCSTORE > Google Tag Manager.
- Enable: Click Yes to enable the extension.
STEP 2
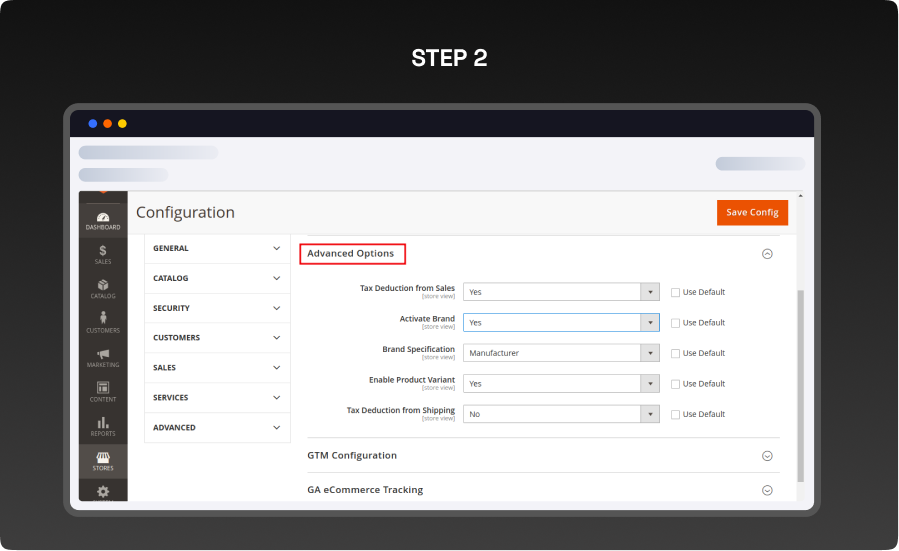
Advanced Options
- Tax Deduction From Sales: Select Yes to subtract tax from the sales.
- Activate Brand: Select Yes to activate this feature and use the value associated with the brand.
- Brand Specification: There are multiple attributes available, color, size, format, allow amount range, and can be redeemed. The brand will be determined based on the selected attribute.
- Enable Product Variant: Select Yes to activate this feature
STEP 3
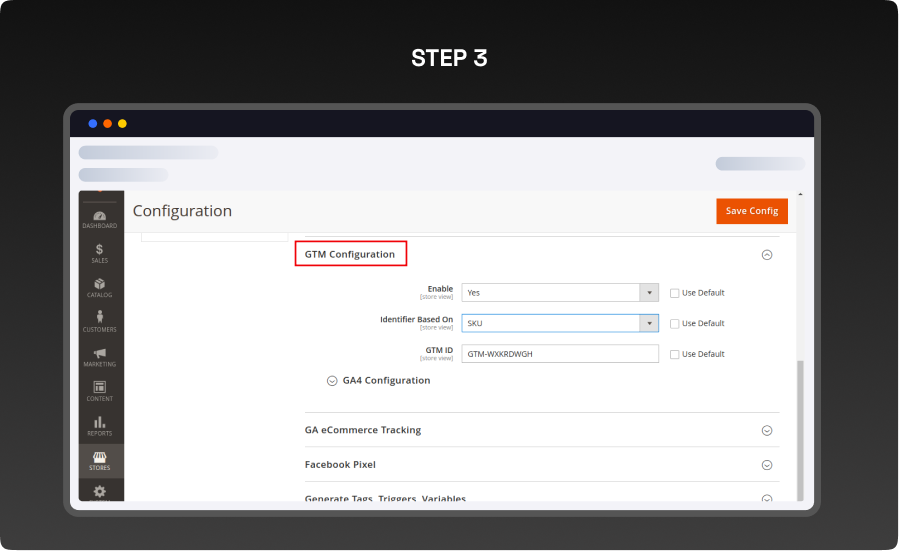
GTM Configuration
- Easily manage all your website s tracking tags from a single, user-friendly interface. This approach eliminates the need for manual code edits for each tag, reducing errors and streamlining the process.
- Enable: Select Yes to activate the Google Tag Manager feature, allowing you to update and control all site tags.
- Identifier Based On: Choose the variable for the product ID to display:
ID: Show the product ID valuee
SKU: Show the product SKU value - Google Tag Manager ID: Enter your Google Tag Manager ID in the Google Tag ID field. This ID is used to update event information for various pages and actions, including category pages, product pages, add-to-cart, remove-from-cart, order success, search, and checkout.
- Note :If left blank or entered incorrectly, the Container ID will not display tag information. To activate Google Tag Manager, create a Trigger and a Tag, then click “Preview or Submit if GTM is disabled.
- Google Analytics 4: Configure tracking for Google Analytics 4 to leverage advanced features and e-commerce tracking. This setup provides deeper insights into user behavior, purchase data, and overall website performance.
STEP 4

GA4 Configuration Enable Google Analytics 4 Integration:
- Enable: Select Yes to add Google Analytics 4 items to Google Tag Manager.
- Activate Analytics Opt-Out: Select Yes to ensure customer data is protected following GDPR when visiting your site.GDPR when visiting your site.
Custom Connection:
- Measurement ID and API Secrets: Enter the Measurement ID and API Secrets values to track events accurately.
To find the Measurement ID:
- 1. In the Google Analytics Admin panel, go to Data Collection and Modification and click Data Streams.
- 2. Select the Web tab.
- 3. Click on the web data stream.
- 4. Locate the Measurement ID in the first row of the stream details.
To generate API Secrets:
- 1. In the Google Analytics Admin panel, go to Data Collection and Modification and click Data Streams.
- 2. Select Web, then click on a web data stream.
- 3. In the web stream details, click Measurement Protocol API Secrets.
- 4. If prompted, review and accept the User Data Collection Acknowledgement.
- 5. Click Create
- 6. Enter a nickname for the secret, then click Create.
- 7. Click the copy icon to copy the secret for use in your POST request
Custom Dimensions
- To create a custom dimension in GA4, follow these steps:
- 1. Sign in to Google Analytics and click Admin.
- 2. Navigate to Custom Definitions and click Custom Dimensions.
- 3. Click the Create Custom Dimension button
- 4. Enter a Name and Scope for the dimension.
- 5. Click Create.STEP 6
- Custom Dimensions allow you to collect and analyze attributes from your store that are not automatically tracked by Google Analytics 4.
Custom Metrics:
- 1. In the Custom Definitions section, choose Custom Metrics
- 2. Click Create Custom Metric
- Custom Metrics enable you to collect and analyze specific attributes from your store thatare not automatically tracked by Google Analytics 4
Note
- Ensure that the Parameter Name you enter matches the one used in GA4 to synchronize data correctly.
- On your Magento site, if the Parameter Name and Index match, the data will be based on the most recent entry. Duplicate Parameter Names are not permitted.
STEP 5
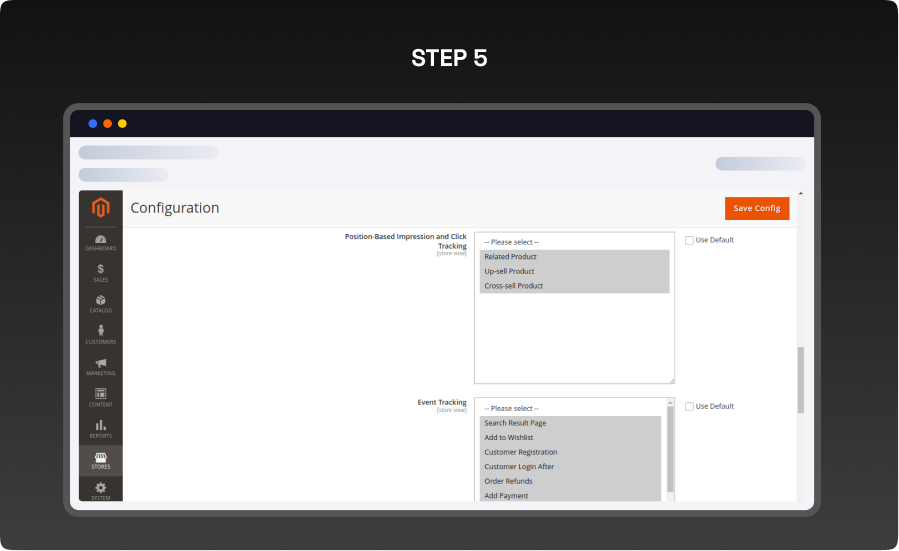
- Position-Based Impression and Click Tracking: Select Related Product or Up-set Product or ‘Cross set Product’.
- Event Tracking: Select Search Result Page
- Add to wishlist Customer Registratioº
- Customer Login After
- Order Refund
- Add Payment
- Add Shipping
- Add to cart
- Remove from cart
- Begins checkout
- Purchase
- View Item
- View Item List
- View Cart
STEP 6
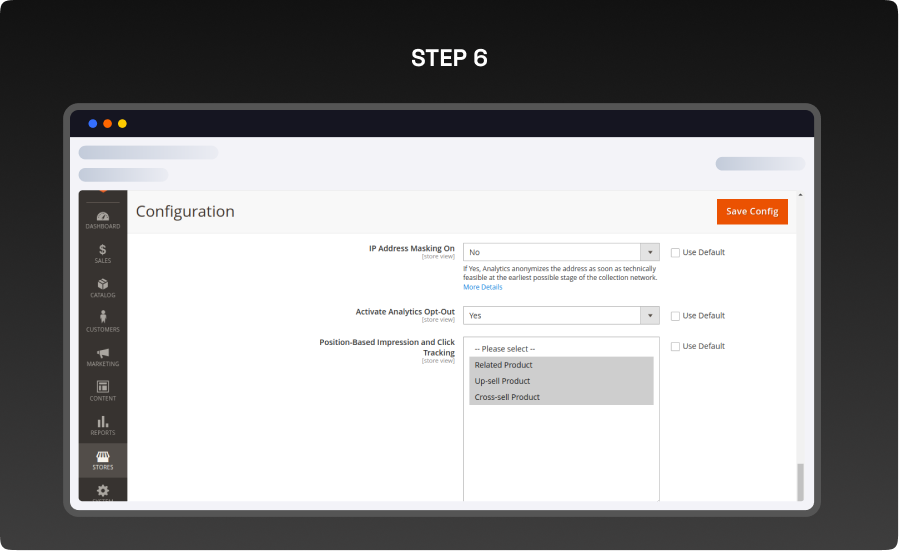
- Configure these links under Store > Configuration > Web. This setup ensures customer
interactions across domains are counted as one session view session data under >br>Acquisition>Overview in Google Analytics. - Google Analytics eCommerce Tracking
- Enable: Select Yes to activate Google Analytics functionality for website reporting.
- Identifier Based On: Choose the product ID variable to display
- ID: Show the product ID value.
SKU: Show the product SKU value. - GA Tracking ID: Enter your Google Analytics Tracking ID. Ensure it is correct to enable proper data tracking.
- Second Tracking ID: Enter an additional Google Analytics Tracking ID to track various website aspects such as product pages, category pages, checkout, cart, and One Step Checkout pages (if compatible). Make sure to input valid Tracking IDs to ensure accurate tracking.
- Activate Enhanced Link Attribution: Select Yes to track each link individually and improve the accuracy of your analytics. This feature distinguishes between multiple links to the same URL on a page, such as different views of the same product.
- Linker Functionality On: Select Yes to combine sessions from related websites (e.g., separate e-commerce and shopping cart sites) into a single session.
- Linker Domain Configuration: Enter additional domain links to track customers across related sites. Separate multiple domains with commas (e.g., example.com ).
- Configure these links under Store > Configuration > Web. This setup ensures customer interactions across domains are counted as one session view session data under Acquisition>Overview in Google Analytics.
STEP 7

- IP Address Marketing On: Select Yes to anonymize IP addresses in Google Analytics. This will mask visitor IPs and display their regional data.
- Note : It may take some time for Google Analytics to update data for features like Link Attribution and Linker. Install and enable the Google Analytics Debugger and Page Analytics browser extensions to support reporting features and view click data.
Activate Analytics Opt-Out:
- Select Yes to ensure data is only synced to Google Analytics if visitors accept cookies. This feature helps protect customer information and is compatible.
Custom Dimensions:
- Go to Admin > Custom Dimensions and click Add New Custom Dimension.
- Enter the Name, Track Custom Attribute, and Index values to collect and analyze store attributes not automatically tracked by Google Analytics.
Custom Metrics:
- Go to Admin > Custom Dimensions and click Add New Custom Dimension.
- Enter the Name, Track Custom Attribute, and Index values to collect and analyze store attributes not automatically tracked by Google Analytics.
- Note: Custom Reports in Google Analytics require both Dimensions and Metrics to be created and customized together.
- Linker Domain Configuration: Enter additional domain links to track customers across related sites. Separate multiple domains with commas (e.g., example.com ).
Track Impressions and Clicks By Position:
- Choose one or more product locations (e.g., Related Products, Up-sell Products, Cross-sell Products, Search Results) to track impressions and click numbers for products.
STEP 8
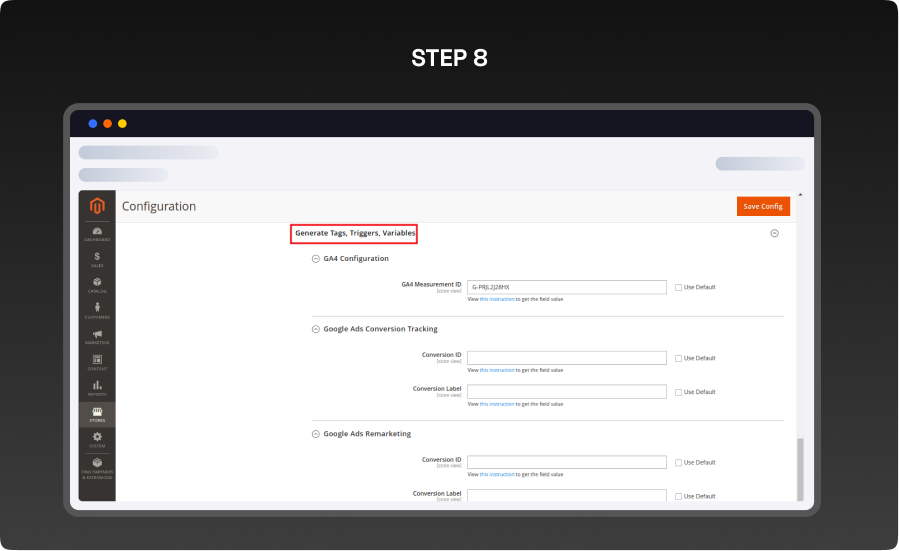
Generate Tags, Triggers, and Variables:
- For advanced users, this module offers detailed control over tag creation. Define custom tags for specific user interactions or website events, set triggers to control when tags activate, and create variables to store dynamic data for precise tracking.
- GA4 Configuration
- GA4 Measurement ID: Enter your generated GA4 ID, for example, G XXXXXXXXX. Google Ads Conversion Tracking
- Google Ads Conversion Tracking
- Get Conversion ID and Conversion Tracking from here https://support.google.com/tagmanager/answer/6105160
- Google Ads Remarketing
- Get the Conversion ID and Conversion Label from here https://support.google.com/tagmanager/answer/6106960
Enter essential information to export a JSON file, including:
- Measurement ID (Google Analytics 4)
- Conversion ID and Conversion Label (Google Ads Conversion Tracking and Remarketing)
- Click the Export JSON File for Tags, Triggers, and Variables button to generate the file.
- Upload the JSON file to Google Tag Manager to create and import your tags, triggers, and variables
- You can upload the file here
FRONTEND
STEP 9
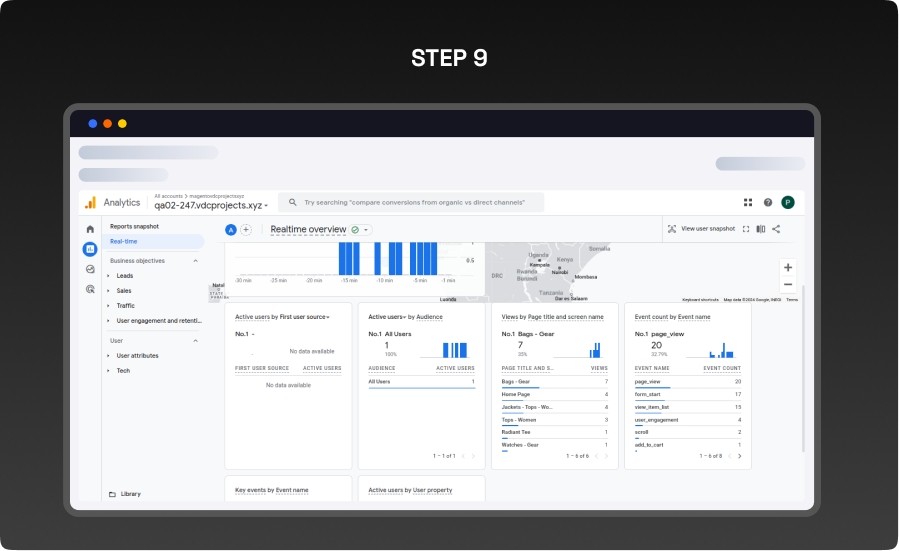
- You will be able to see all the items from Tag Manager as shown in the screenshots.
STEP 10
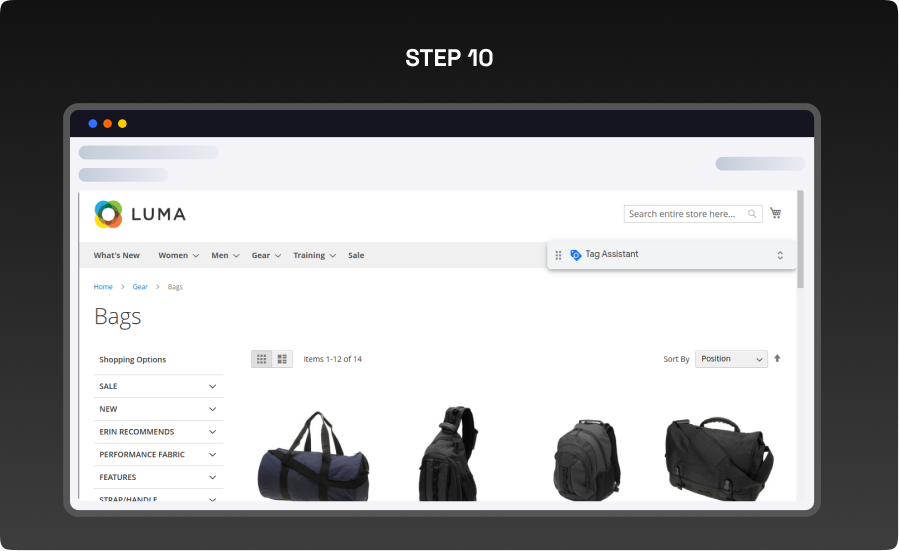
- All the events that will be fired in the frontend, will be visible here as per the screenshot.
What you'll obtain with our Magento Technical Audit
With VDC Store's Magento eCommerce technical audit you'll gain expert separate in-depth analysis with an exhaustive summary of the state of your store's code grade and overall usability.

-

An organizational summary of discoveries with preferences and a brief overview
-
3rd party extensions initial review
-
An exact description of results and suggested solutions
-
Database innocence review (to secure that data is recorded precisely as planned)
-
Top preferences for your architects
-
Code quality examination (periodic reflection of your store source code)
-
Examination of possible Magento core design changes
-
Speed and execution analysis (HTTP requests, optimizations, exhale headers…)
By a technical appraisal, the client not only obtains information about the issues the store is facing but also this examination by VDC Store allows them to acquire beneficial information and concepts for setting up programs to enhance sales and conversion drivers.
Our analysis appreciates the essence of your business. We are not utilizing an automatic procedure that is used in every case. We want to make sure you end up with suggestions based on the exact condition of your store. Start the discussion about the Magento technical audit you're curious in by filling out the Contact Us form.
Why Choose the VDCStore Magento 2 Google Tag Manager Extension
Tracking customer behavior and managing analytics tags shouldn’t require developers every time you launch a campaign or test a new third-party tool. The VDCStore Magento 2 Google Tag Manager Extension empowers merchants to integrate Google Tag Manager (GTM) with their Magento store effortlessly — giving you centralized control over all your tracking tags, pixels, and marketing scripts without touching code. From analytics and remarketing to conversion tracking and A/B testing tools, Google Tag Manager helps you deploy and manage tags quickly and securely. This extension ensures seamless GTM integration, accurate data capture, flexible configuration, and performance-friendly operation within Magento 2, helping store owners make smarter decisions based on reliable insights and analytics.
FAQs

Live Demo


Explore Our Customer Reviews
Dr Zahid
 Verified
Very happy with the website service!
Very happy with the website service. Great communication, high-quality design, and timely delivery. Everything was handled professionally, and the end result exceeded our expectations. Would definitely recommend.
Ravinder Gupta
VerifiedGreat experience
Great experience working with this software company. The team is professional, responsive, and delivered exactly what was promised.
Erel Support
VerifiedExtremely satisfied
I am extremely satisfied with the website they built for us. They listened carefully to our ideas, suggested improvements, and delivered a site that perfectly represents our brand.The process was smooth,strees-free,well organized.Great attention to detail and excellent support even after launch
Anurag Kumar
VerifiedGreat experience working with this team
We had a great experience working with this team for our website. They were Professional, responsive, and clearly understood our requirements from the start. The final website looks clean and modern and works perfectly across all devices. Communication was smooth throughout the project, and everything was delivered on time. Highly recommended for anyone looking for reliable website services and extensions.
Amol Bhoyate
VerifiedReliable, Professional, and High-Quality Web Development
We had a great experience working with VDC Store for our website development needs. From the very beginning, their team was professional, responsive, and attentive to our requirements. They clearly understood our vision and delivered a modern, user-friendly website that aligns perfectly with our business goals.
Comparison
Explore Our Hyvä Theme Demos

Fashion Store
Experience lightning-fast browsing and seamless product discovery in our Fashion demo, designed for smooth navigation and instant page loads.

Jewelry Store
Experience a sleek, lightning-fast browsing experience with our Jewelry demo — optimized for smooth navigation and instant product loading. Modern design meets high performance for flawless shopping.

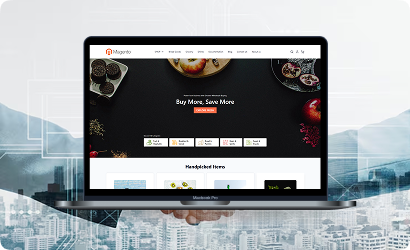
Furniture Store
Our Furniture demo delivers fast, responsive pages and seamless product filtering, letting users explore large collections without delay. Performance-driven design for ultimate online convenience.
Electronics Store
Explore the Electronics demo with blazing-fast load times and smooth interactive features, ensuring a high-speed, immersive shopping experience. Optimised for tech-savvy customers.

Fitness Store
The Fitness demo combines speed and responsiveness with effortless navigation, making it easy to browse workout gear and accessories quickly. Built for fast, engaging online fitness shopping.

Beauty Store
Enjoy instant load times and smooth interactions in our Beauty demo, designed for a seamless, high-performance shopping journey. Perfect for browsing beauty products without interruptions.
B2B Store
Our B2B demo emphasizes speed and efficiency, handling bulk catalogs and quick ordering without lag. Engineered for high-performance business-to-business operations.
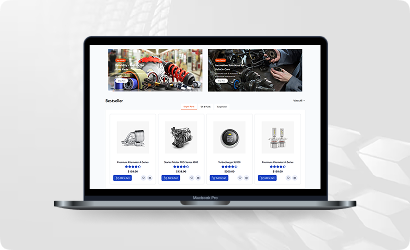
Auto Store
The Auto demo offers responsive navigation and rapid product searches, making car parts and accessories easy to find. Optimized for high-speed, performance-driven shopping.

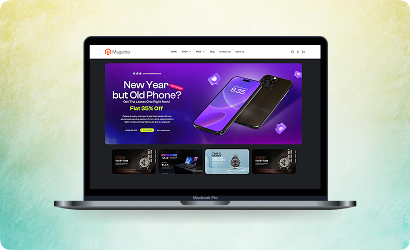
Hyvä Demo Store
Experience the Hyvä demo’s cutting-edge performance with near-instant page loads, smooth animations, and superior responsiveness. Designed for modern, lightning-fast eCommerce.
FANTASTIC AND PREMIUM CLIENTS
Trusted by
Need More Help?
Save time by starting your support request online and we'll connect you to an expert. Save time by starting your support request.